Thursday, February 23, 2012

Skittles Infused Vodka

I know this isn't what I normally post on my blog but I had so many people ask me for the recipe that I wanted to post it anyway.  This was a gift for my co-worker for her 21st birthday.  I ran across this recipe on Pinterest and immediately knew that my coworker would love this because she loves Skittles.  I am not going to lie, it was a pain in the rear to make.  The skittles all dissolve in the vodka, but then you have to strain out the white stuff left behind.  I bought coffee filters but they didn't work very well.  Maybe it would have been easier with cheese cloth or another straining method, but it took me a few hours to get the vodka free of floating white stuff.  The colors are very vibrant and they have great flavor and smell, but if you are going to make this, set aside a few hours.  I have heard Jolly Rancher Vodka is delicious too but way easier to make because there is no straining involved.  Ill keep you posted when I make the Jolly Rancher version.

Waiting for the Skittles to dissolve...


Adapted from -  Mixthatdrink.com
Yield: 5 - 8oz Bottles of Vodka
Ingredients:
  •  1.75 L Of Vodka - Dont use the cheap stuff, and you dont have to use the fancy stuff, something in between is perfect - I used Svedka
  • Five 8.5 ounce flasks or bottles - I just used glass bottles I found at the grocery store.
  • One 14oz Bag of Skittles
  • Five empty plastic water bottles
  • A funnel- I didnt use this....
  • Bowls for separating the Skittles into flavors - I just sorted them on a paper towel
  • A measuring cup (not pictured)
  • Coffee filters or paper towels
Directions:
  1. You’ll also want to cover your workspace with newspaper or freezer paper – this infusion can get messy. If you’re making a different sized batch, here’s the formula you need to know: I used 65 Skittles to 7 ounces of vodka, which yields about 8 ounces of infused vodka.
  2. Start by simply separating the Skittles into flavors. You want 60 of each.
  3. Fill your water bottles with 6 ounces of vodka each. It doesn’t need to be exact – you can always even it out later by pouring in a bit more vodka to the ones that come out with less.
  4. Pour the Skittles of one flavor into one infusion bottle, then pour the next flavor of Skittles into the next infusion bottle, and so on until all five bottles have a pile of Skittles soaking in the vodka.
  5. Now your infusion bottles all have Skittles in the bottom. Give each bottle a good shake – the more, the better. In my picture here, you can see that the colored candy coating has already rubbed off into the vodka, but the white insides of the Skittles still have a lot of dissolving to do. After shaking them, set them aside for a few hours. It’s a good idea to shake them again then, especially if you’re making a bigger batch. My Skittles all dissolved overnight.
  6. Once they’re all dissolved, you’ll notice a lot of white muck floating at the top. We’ll take care of this in Step 6.
    1. here are a number of ways to strain this stuff and get all the white gunk out. Some people prefer paper towels, but I used coffee filters and found they worked just as well. I put a strainer inside a measuring cup.
    2. Then I put four coffee filters in the funnel. It’s hard to say exactly how many you’ll need, since not all coffee filters are exactly the same. I’ll tell you one thing I did learn, though: orange and green needed more filtration than the others. I discovered this when I thought I was finished, and found a little bit of white stuff still floating in those two flavors. No problem, though: I just strained them again through one more coffee filter, and that took care of it. So if you find you haven’t strained it thoroughly enough, the good news is: you can always fix that later
    3. Then I poured one of the infusions into my strainer setup. I had to pour about a quarter of my infusion in, then wait for some of it to soak through, then pour another quarter in, until I was done. (If the strainer clogs with white gunk, use a spoon to scrape the white gunk out of the way.) In the end, you’ll have about 8 ounces of Skittle infused vodka.
  7. Then I took the liquid from the measuring cup and poured it into a flask.
  8. Repeat this process for each flavor.
  9. Stick them in the freezer for several hours until chilled. Serve as a shot or in a mixed drink. 

Wednesday, February 22, 2012

Vanilla Cupcakes With Chocolate Buttercream

Happy 21st Birthday Desiree

I made these cupcakes for a coworkers birthday.  She said she liked white bottom with chocolate frosting.  I decided to make the vanilla bottom that I love, and I found a new recipe for the buttercream.  The cupcake is light and fluffy as always, so good you can eat it plain.  The buttercream turned out perfectly chocolatey and smooth.  Best chocolate buttercream ever.  I sprinkled some decoration on top and ta-da, they were finished.  These taste better then store bought but are just as easy!!


Vanilla Cupcakes - Adapted from my Churro Cupcakes
Yield: 12 cupcakes
Ingredients:
1/2 Cup Butter, unsalted and room temperature
1 Cups Sugar
2 Large Eggs, separated
1 1/3 Cup Flour
3/4 Teaspoon Baking Powder
1 Pinch of Salt
1/2 Cup Milk
1 1/2 Teaspoon Vanilla

Directions:
  1. Preheat your oven to 350˚F and line a muffin tin with baking cups.
  2. Beat the butter in the bowl of a stand mixer on medium speed. Once the butter is smooth and creamy, turn the mixer to low speed and add the sugar. Keep beating the butter and sugar mixture until light and fluffy. 
  3. Add the egg yolks one at a time, making sure to mix well after each addition. 
  4. In a medium bowl, whisk together the dry ingredients: flour, baking powder, and salt.
  5. In a small bowl, stir the vanilla into the milk. Alternate adding the flour mixture and the milk mixture to the butter-and-sugar mixture. You’ll want to start and end with the flour, and mix just until incorporated after each addition.
  6. In a medium bowl, using a hand mixer, beat the egg whites until soft peaks form. It’ll be white and foamy. Fold the egg whites into the batter.
  7. Fill your lined muffin cups about ¾ full of batter. Bake for about 18 minutes or until a cake tester stuck in the middle comes out clean. 
  8. Let cupcakes cool completely. Frost.

Chocolate Buttercream - Adapted from Savorysweetlife.com
Yield: 3 Cups - too much for 12 cupcakes...
Ingredients:
1 Cup Unsalted Butter, room temperature
3 1/2 Cups Confectioners Sugar
1/2 Cup Cocoa Powder
1/4 Teaspoon Salt
2 Teaspoons Vanilla
3-4 Tablespoons Milk

Directions:
  1. Cream butter for a few minutes in a mixer with the paddle attachment on medium speed. Turn off the mixer. 
  2. Sift 3 cups powdered sugar and cocoa into the mixing bowl. Turn your mixer on the lowest speed (so the dry ingredients do not blow everywhere) until the sugar and cocoa are absorbed by the butter. 
  3. Increase mixer speed to medium and add vanilla extract, salt, and milk/cream and beat for 3 minutes. If your frosting needs a more stiff consistency, add a little more sugar. If your frosting needs to be thinned out, add additional milk 1 tablespoon at a time.
  4. Frost!

Tuesday, February 14, 2012

Apple Cinnamon & Oat Scones

Happy Valentine's Day!!

Scones!!  These scones taste like an apple pie, can you say delicious!? I found this recipe in a Martha Stewart magazine and I have been wanting to make them for about a month.  My boyfriend had his treat day last week and I thought this would be perfect for him to take to work.  Needless to say, they were a huge hit.  It's a perfect breakfast treat.  So delicious....


Apple & Oat Scones - Adapted from Martha Stewart Living Magazine
Yield: 12 Scones
Ingredients:
1 2/3 Cup Flour
1 1/3 Cup Old-Fashioned Rolled Oats, plus more for topping
1/4 Cup + 2 Tablespoons Light Brown Sugar, plus more for topping
1 Heaping Teaspoon Cinnamon
2 Teaspoons Baking Powder
3/4 Teaspoon Baking Soda
1/2 Teaspoon Salt
1 1/2 Stick Cold Unsalted Butter, cut into pieces
1 1/2 Cups Granny Smith Apple Chunks, I used 2 large apples cut into 1/4-inch cubes - It was a lot of apple...
2/3 Cup Cold Buttermilk, plus more for brushing

Directions:

  1. Preheat oven to 400.
  2. Whisk together flour, oats, brown sugar, cinnamon, baking powder, baking soda, and salt.
  3. Cut in butter with a pastry blender, or rub in with your fingers - The largest pieces should be the size of a pea.
  4. With your fingers, flatten the butter pieces into small discs.  Add the apples and buttermilk, stirring the dough just until it comes together.
  5. Turn the dough out onto a lightly floured surface.  Pat dough into a rectangle, cut the dough with a floured knife into 12 pieces, or smaller depending on how many scones you want to make.
  6. Place on a baking sheet about 2 inches apart.  Brush with buttermilk and then sprinkle with sugar and oats.
  7. Bake until golden brown, about 20 minutes. Let them cool for 10 minutes. 
  8. Enjoy warm or room temperature!!

Sunday, February 12, 2012

Reece's Peanut Butter Hearts

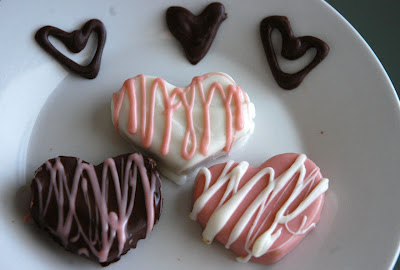
Valentine's Day is coming!!! Here are some homemade Reece's Peanut Butter hearts.  They are as close as it gets to the real thing.  My boyfriend loves Reece's so I made these for him.  I haven't got down the dipping or decorating yet.  Its harder then it looks dip things in chocolate, and I am not very good at it.  Out of about 20, only about 4 came out presentable.  I think using the candy melts are easier then using real chocolate,  the thinner the coating the easier to work with.  Well I am going to pick up my boyfriend from the airport today and I will surprise him with one of these.  If he likes it, then we know they are good!  Wish me luck!


Reece's Peanut Butter Cups - Adapted from Flour Me With Love
Yield: 2 dozen, depending on thickness
Ingredients:
1/4 Cup Butter
1 1/2 Cups Creamy Peanut Butter
1/8 Teaspoon Salt
4 Cups Powdered Sugar
2-3 Tablespoon Milk
Chocolate (or white, or pink) for coating

Directions:
  1. Cream together the butter, peanut butter and salt.
  2. Slowly mix in the powdered sugar until it becomes crumbly.
  3. Add the milk and mix until it starts to come together.
  4. Pour out onto a flat surface.
  5. Knead together until it forms a ball.
  6. Roll out to desired thickness.
  7. Cut out whatever shape you like; I like hearts.  Place them on a cookie sheet. 
  8. Place in freezer for about 30 minutes.  Melt the chocolate, let them cool a little bit, then start dipping and decorating.
  9. Enjoy!!

Saturday, February 11, 2012

Valentine's Day Sweet & Salty Popcorn

Its almost that time of year!! Valentine's Day is right around the corner I am scrambling to post a few fun ideas.  Here is a quick and easy recipe for anyone.  Its great for kids and men!  The classic salty and sweet combination here taste great.  How could you go wrong with honey roasted peanuts, 2 types of M&Ms, 2 types of chocolate, and marshmallows all mixed in with popcorn!?  Whats great about this recipe is you can change it up for any holiday or special occasion.  Enjoy!


Sweet & Salty Popcorn - Adapted from Theyummylife.com
Yield: Lots!
Ingredients:
8 Cups Popcorn (I use light butter)
1 Cup Honey Roasted Peanuts
1/2 Cup M&Ms Regular
1/2 Cup M&Ms Peanut Butter
1/2 Cup Milk or Semi-Sweet Chocolate Chips
1/2 Cup White Chocolate
1/2 Cup Mini Marshmallows
1 Tablespoon Canola Oil, divided
1 Teaspoon Salt
Decorating Sprinkles (red coarse sugar, pink nonpareils, or similar)
Directions:
  1. Spread popcorn on a large baking sheet that has been lined with parchment or waxed paper.
  2. Sprinkle peanuts and M&Ms evenly over top. 
  3. Combine chocolate chips with 1/2 tablespoon oil and melt in microwave. With spoon, drizzle evenly over popcorn mixture. 
  4. Sprinkle with coarse sea salt. Add food coloring and 1/2 tablespoon oil to white chips, melt, and drizzle over popcorn mixture. 
  5. Sprinkle with decorating red sugar and pink nonpareils. After melted drizzles harden, break into pieces and store in airtight container or sealed plastic bags.
  6. Enjoy!!

*Modify food coloring and M&M colors for any occasion: colors of sports teams or schools, green for St. Patrick's Day, red/blue for 4th of July, black/orange for Halloween, red/green for Christmas, etc. Food coloring can be omitted entirely--use plain white melted chocolate and rely on M&Ms and sprinkles to add color to the mix.

Sunday, February 5, 2012

S'mores Cookie Bars

Happy Super Bowl Sunday!! I hope everyone had a great party with lots of delicious food and treats!  I made these to bring to a friends super bowl party, and they were a huge hit!! How could you go wrong with all the S'mores ingredients packed into a cookie!?  Whats amazing is the graham cracker stays crispy on the bottom, and then if you cook the cookie part just right then it stays gooey, and you can really taste the marshmallow.   This is an All-American treat for an All-America day!! Enjoy!!!


S'mores Cookie Bars - Adapted from Lovintheoven.com
Yield: 32 Squares
Ingredients:
11 Tablespoons Unsalted Butter, softened
1 Cup Brown Sugar, packed
½ Cup Granulated Sugar
2 Large Eggs
1 Teaspoon Vanilla
1 Teaspoon Baking Soda
½ Teaspoon Salt
1/2 Teaspoon Cinnamon
2 ½ Cups Flour
1 Cup Semi-Sweet Chocolate Chips
1 Cup Mini Marshmallows
3 Regular sized Hershey’s bars, broken into pieces
1-2 Packages Graham Crackers, broken into squares

Directions:
  1. Preheat the oven to 375 degrees. Line baking pans with parchment paper. I used one 11x17 pan and one 9x13 pan but you can really use any sized pans you want.
  2. Lay out graham crackers side by side on the pans as close as possible (they should be touching).
  3. Cream together the butter and both sugars. Add the eggs and vanilla.
  4. Gradually mix in the dry ingredients: flour, baking soda, salt and cinnamon.
  5. Fold in the chocolate chips and marshmallows. 
  6. Chill dough in refrigerator for 1 hour.
  7. Place rounded tablespoons of dough on graham crackers.
  8. Bake for 5 minutes then remove from oven to press Hershey’s bar pieces on to the top. 
  9. Bake for and additional 5 – 7 more minutes or until dough is beginning to turn golden brown at the edges. 
  10. Make sure cookies are completely cool before cutting, otherwise you'll end up with a doughy mess!
  11. Enjoy!!